Approving and Rejecting Builds
When QA review is enabled, every executed build waits for approval before finished goods are added to inventory. This article covers both the approval and rejection workflows.
Finding Builds Pending QA
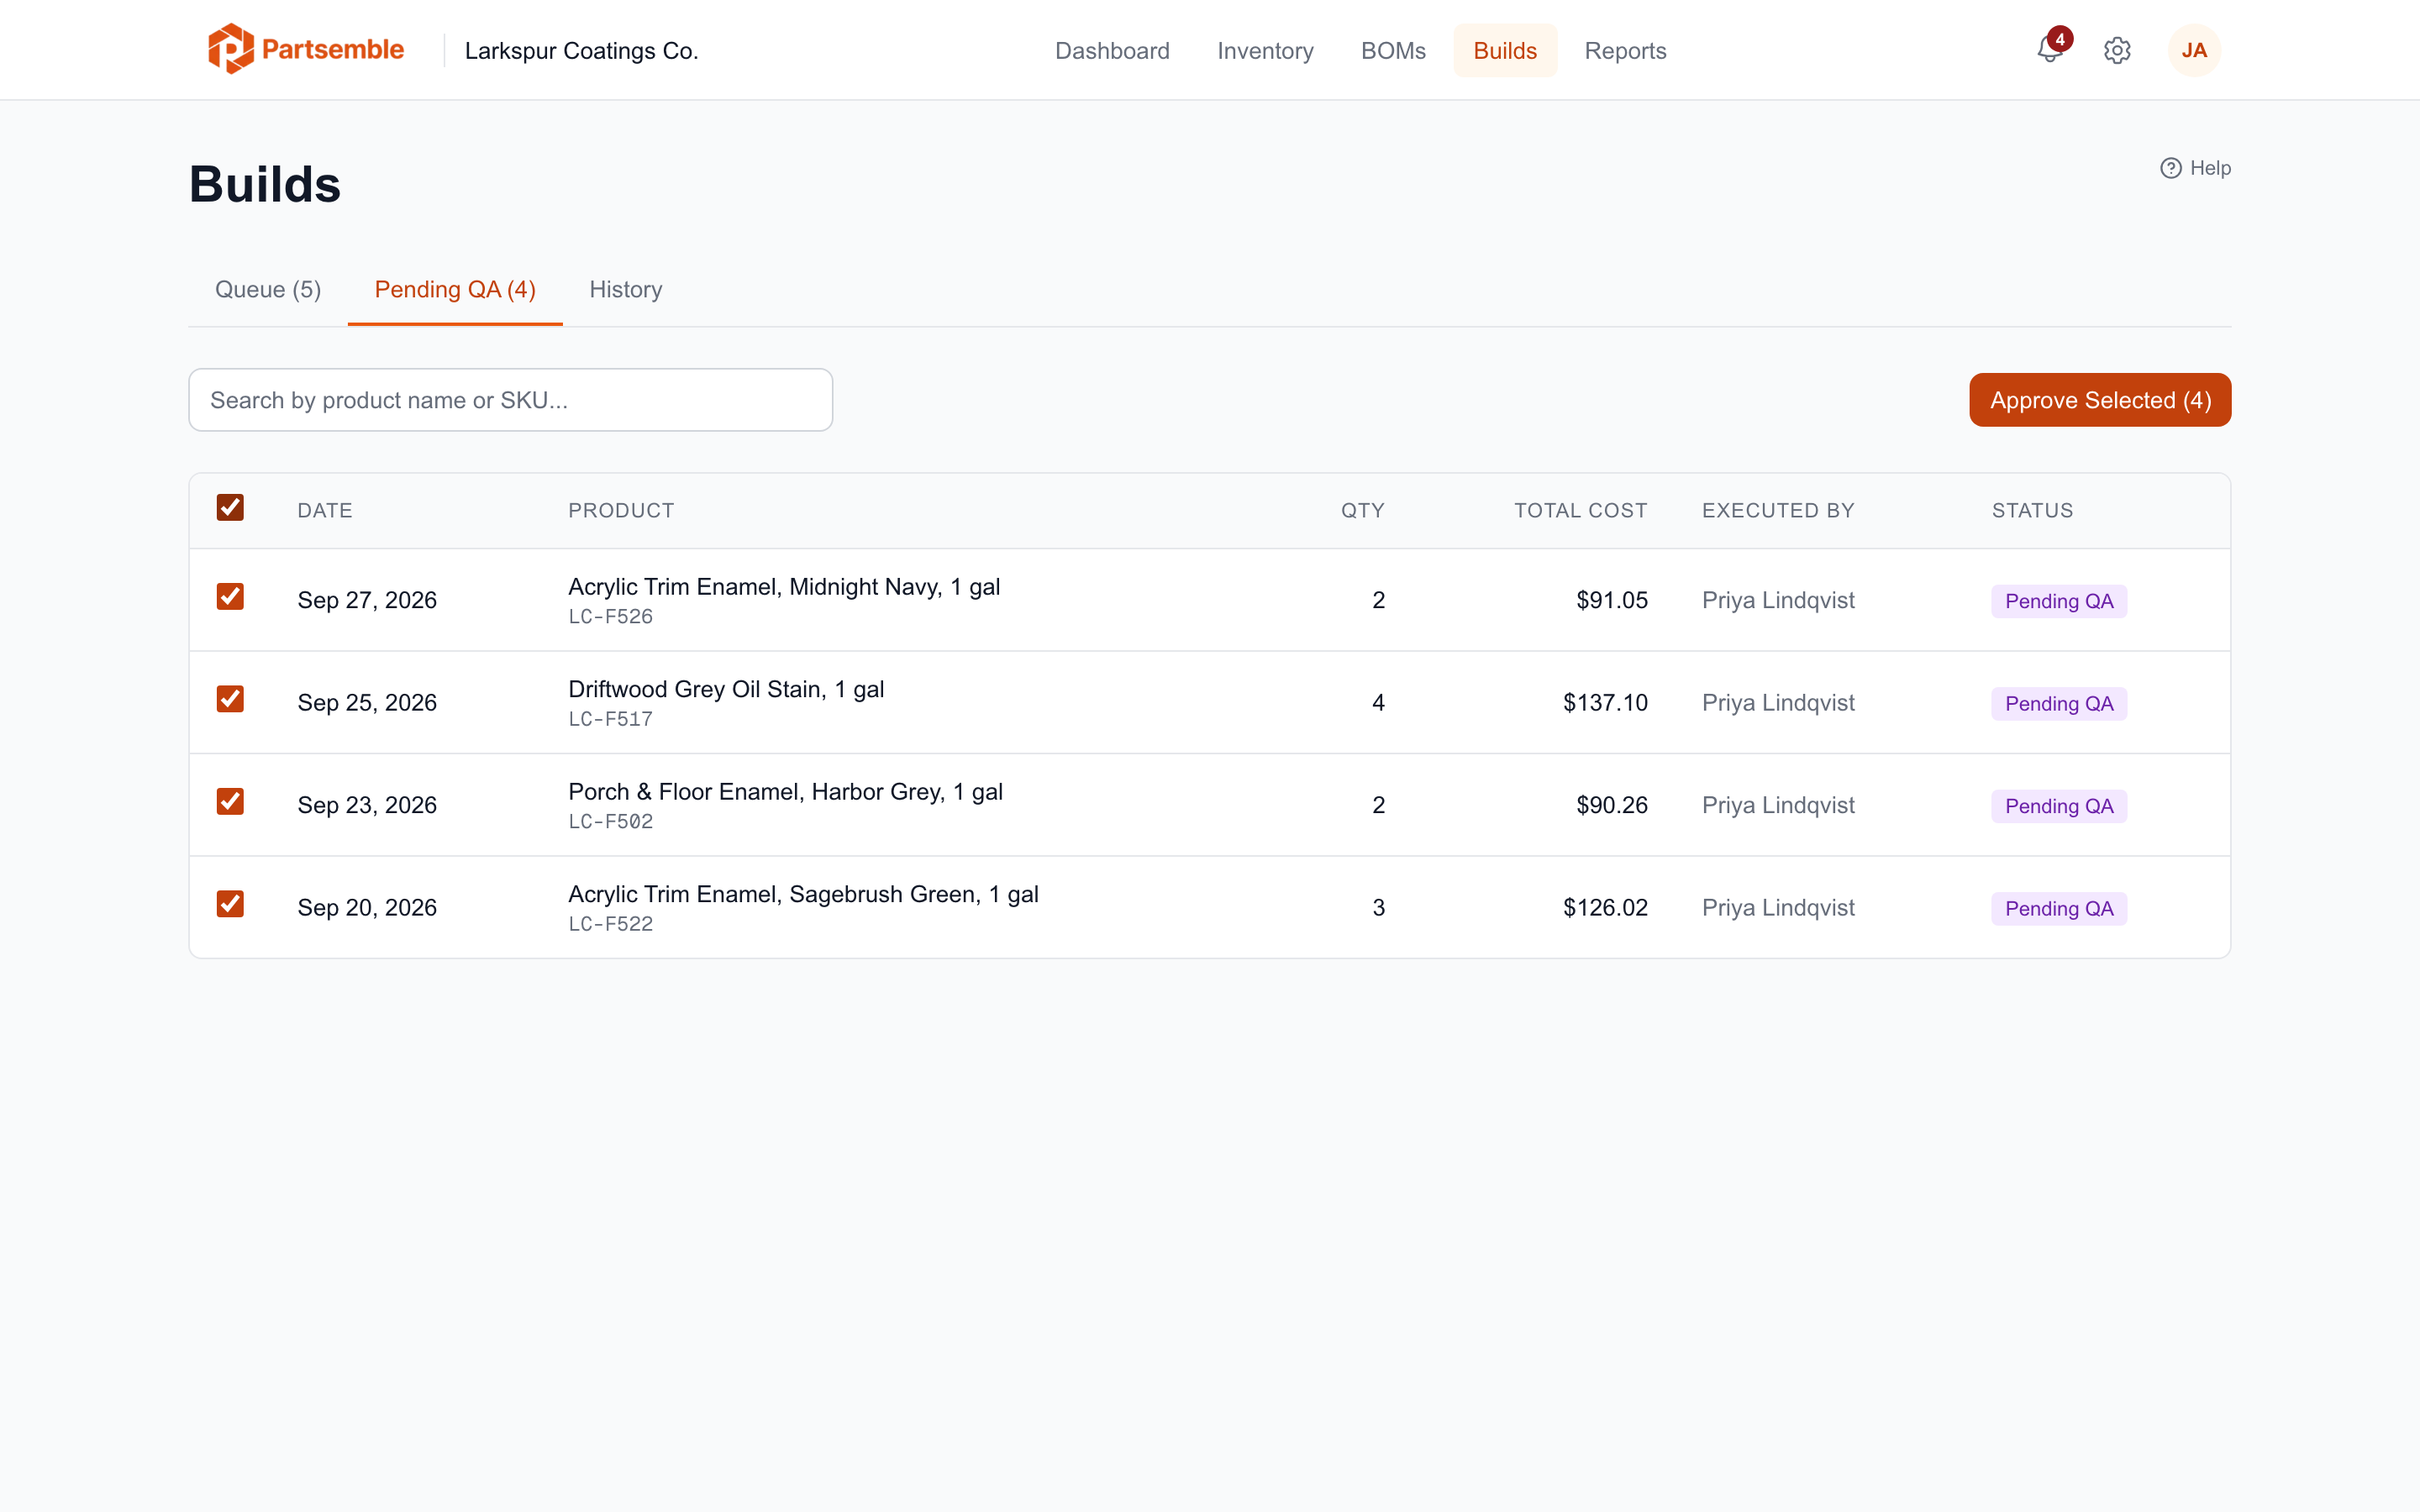
Builds waiting for review show the status Pending QA. You can find them in:
- Builds → Pending QA — the tab lists every build waiting for review, with the count in its name, for example Pending QA (4). Search by product name or SKU, and click a row to open the build.
- Build detail page — any build at Pending QA shows the Approve and Reject buttons
The Pending QA tab appears only while QA review is on.
Approving a Build
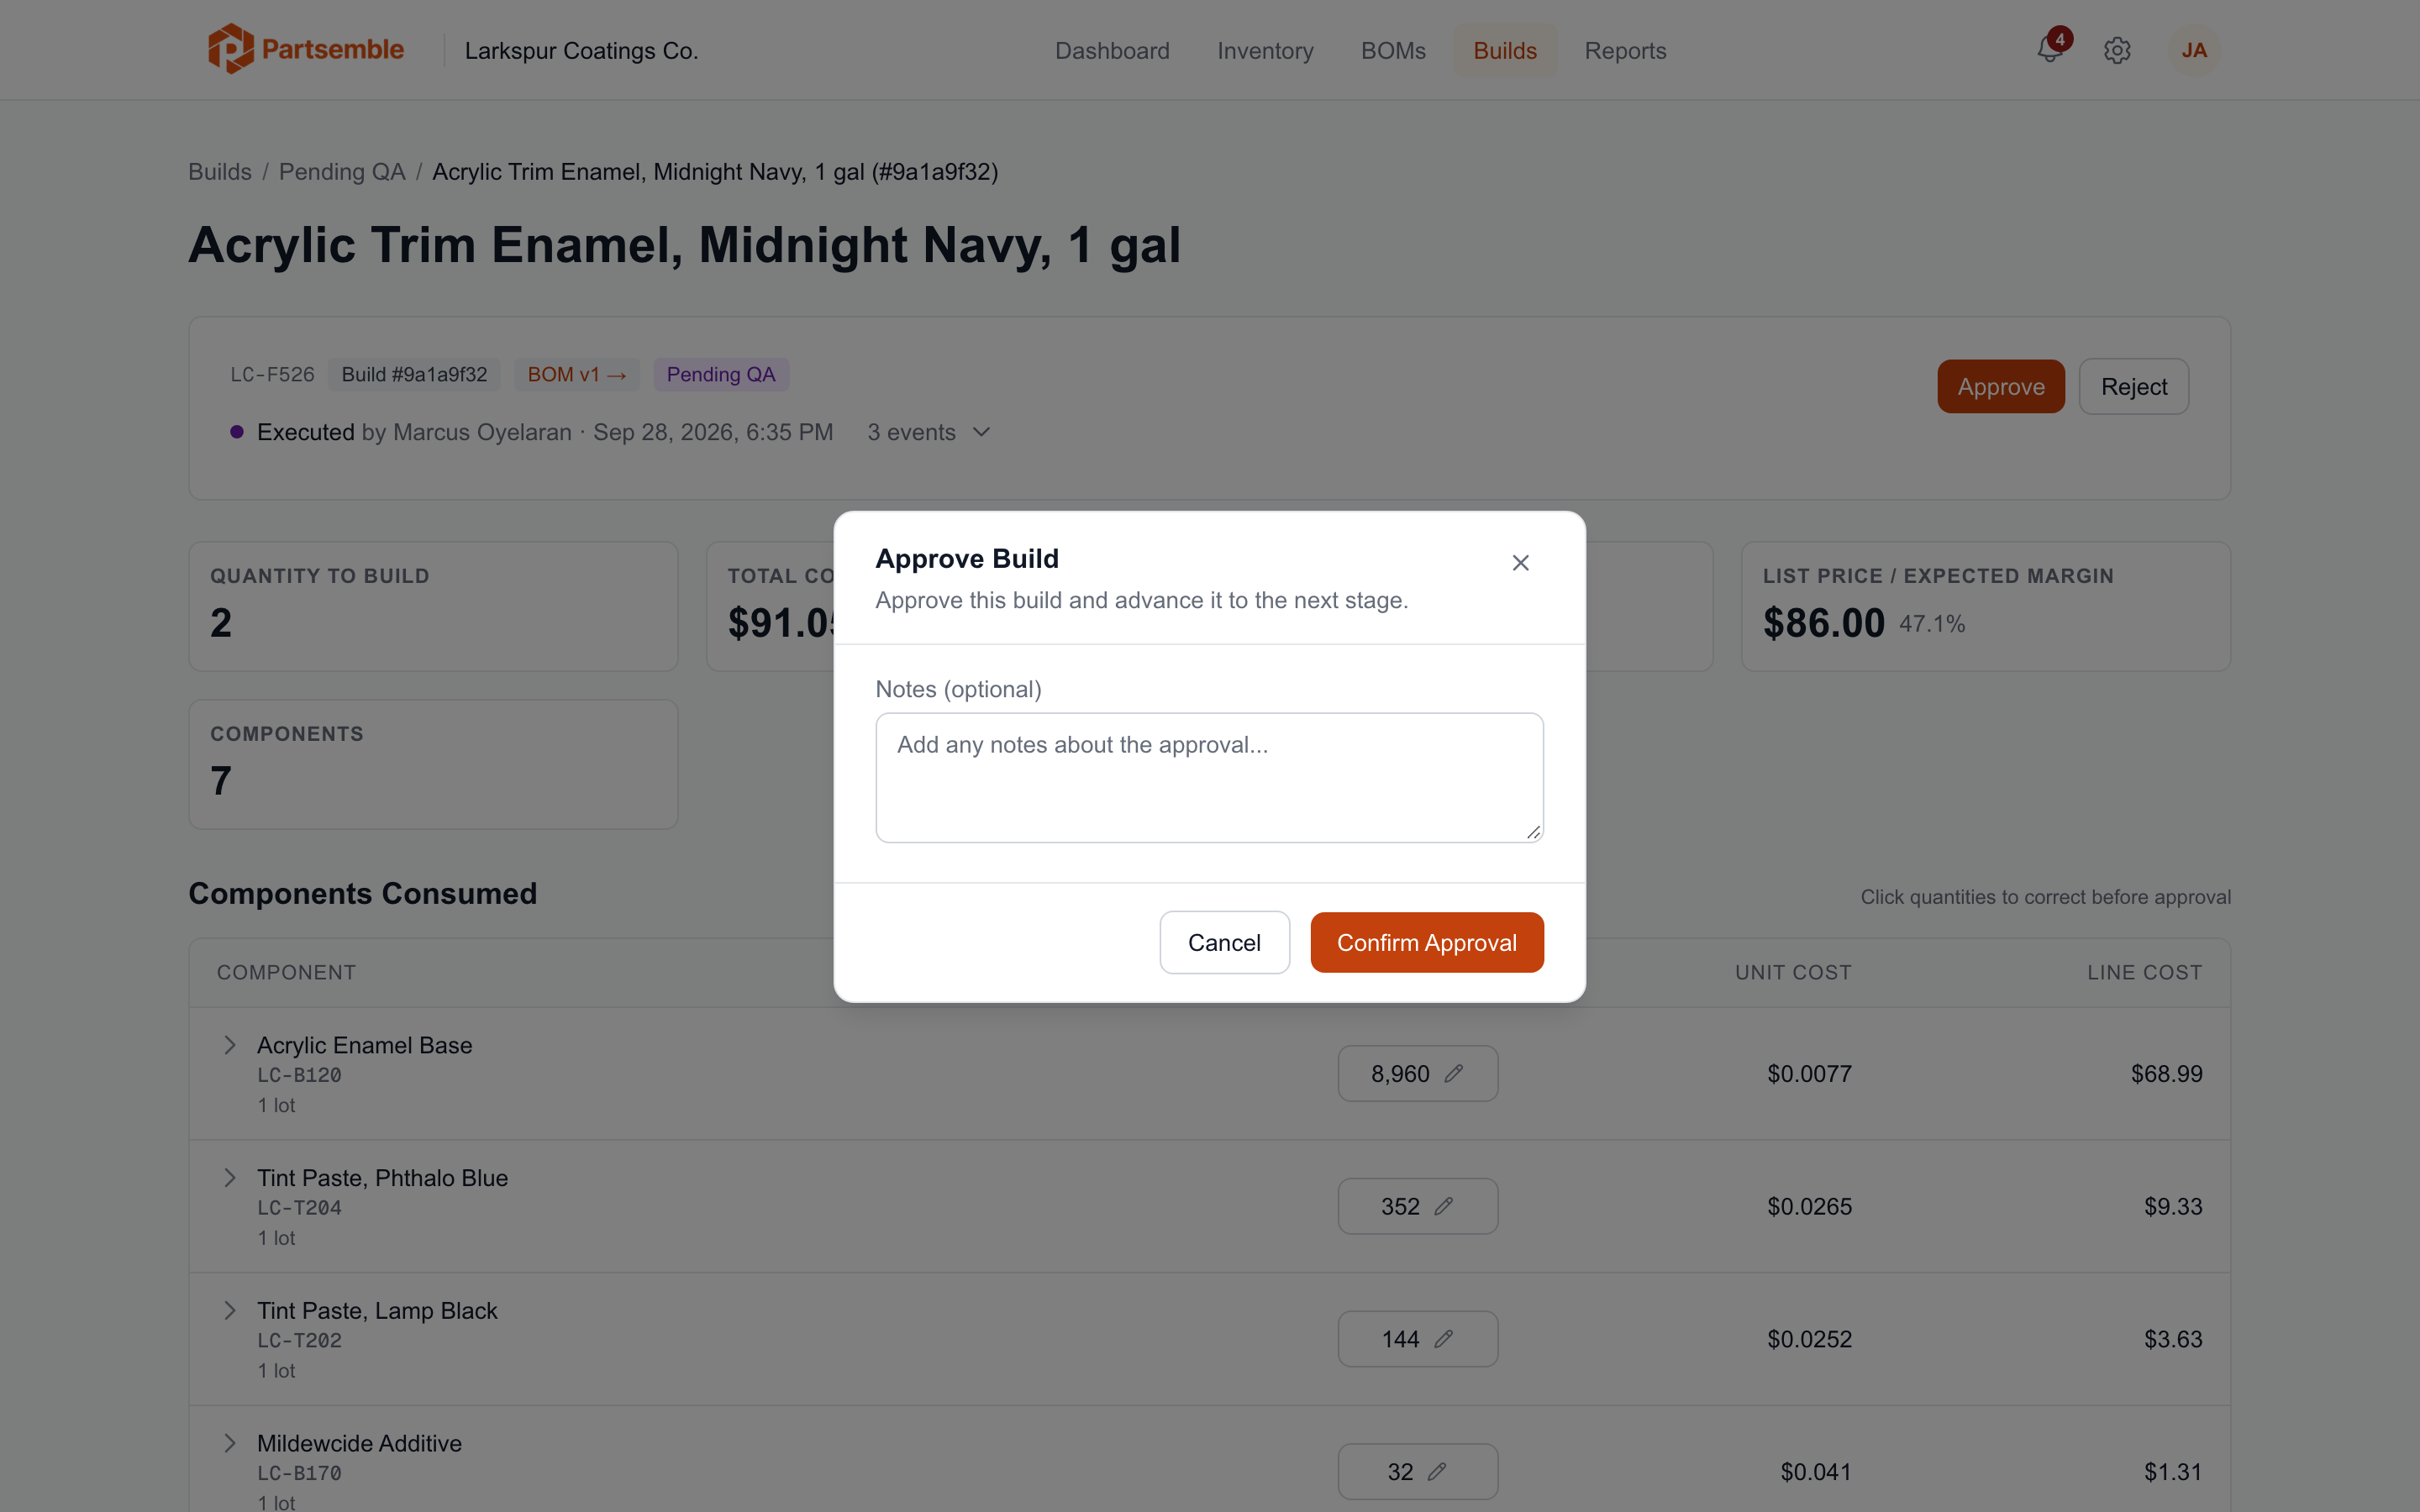
Open the build detail page and click Approve. A confirmation dialog appears where you can optionally add notes. Click Confirm Approval.
When you confirm approval:
- Finished goods are added to inventory — the product's stock on hand increases by the quantity built
- The finished good's unit cost is updated. With receiving on, approval creates the build's output lot and the unit cost becomes the weighted average of the product's active lots. With receiving off, the unit cost becomes this build's cost per unit.
- The build moves to Pending Export status (ready for accounting export)
- If auto-export is configured, the build is exported to accounting immediately
- Build point checks run — if finished good stock crossed a threshold, auto-generated builds may be adjusted
For example, Larkspur's build of 2 × Acrylic Trim Enamel, Midnight Navy, 1 gal cost $91.05, or $45.525 per unit. Larkspur has receiving on, so approving it adds a lot of 2 at $45.525 and the product's unit cost becomes the weighted average of its active lots. Without receiving, the unit cost would become $45.525.
The approval records who approved the build and when, creating a clear audit trail.
Correcting a build before approval
If the build used more or less than it recorded, correct it before you approve. On a build at Pending QA, click any value under Quantity Consumed in Components Consumed and type what was actually used. With labour and overhead costs turned on, you can also click a Cost/Unit under Labor & Overhead, or click + Add Cost Line to add one. The build's total cost follows the correction, and the change is recorded in the build's history.
For example, if the Midnight Navy batch used 9,000 of Acrylic Enamel Base rather than the 8,960 recorded, click 8,960, type 9,000, and press Enter before approving.
Approving several builds at once
On Builds → Pending QA, tick the builds you want to approve, or tick the box in the header to select them all, and click Approve Selected (n). Each build is approved in turn, without notes, and a message reports how many were approved and how many failed. Rejection is always one build at a time, from the build's page.
Rejecting a Build
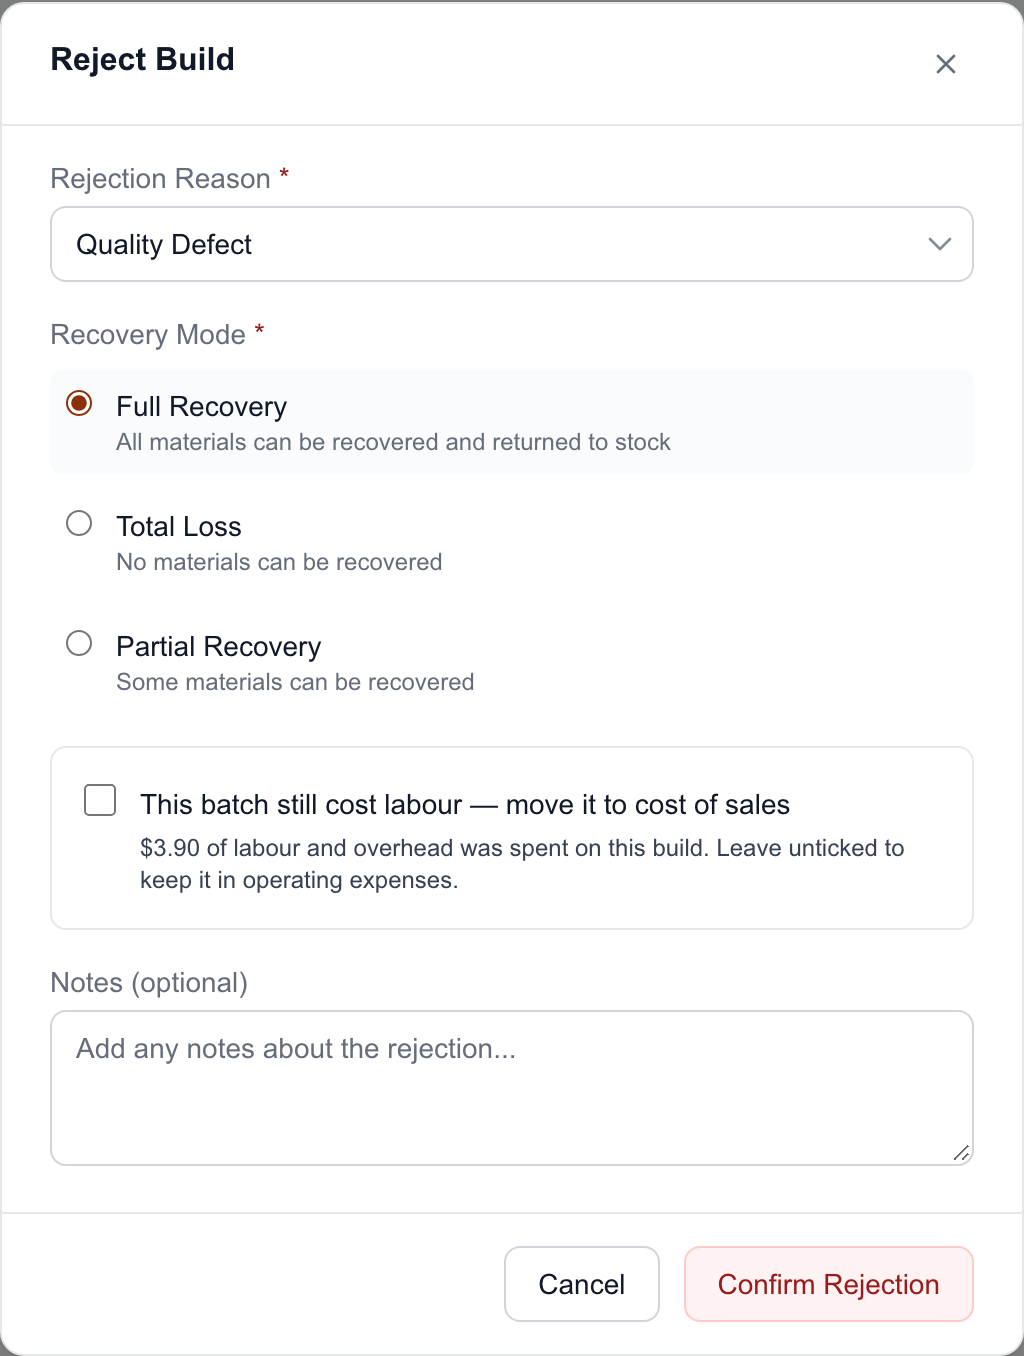
If a build doesn't pass quality inspection, click Reject on the build detail page. The rejection workflow has several steps:
1. Select a rejection reason
Choose from the predefined reasons:
- Quality Defect — the finished product doesn't meet quality standards
- Wrong Materials — incorrect components were used
- Equipment Failure — a machine or tool malfunctioned during production
- Process Error — the build process wasn't followed correctly
- Other — for situations that don't fit the above categories
See Rejection Reasons for guidance on when to use each.
2. Choose a recovery mode
Decide what happens to the consumed components:
- Full Recovery — all materials can be recovered and returned to stock
- Total Loss — no materials can be recovered (everything is waste)
- Partial Recovery — some materials can be recovered, others are lost
See Recovery Modes for detailed explanations of each option.
3. Specify recovery quantities (partial only)
If you chose partial recovery, a table appears showing each consumed component. Enter the quantity recovered for each one. The difference between consumed and recovered is the loss.
4. Decide what happens to the labour (builds with labour and overhead only)
If the build carries labour and overhead cost lines, the dialog shows This batch still cost labour — move it to cost of sales, with the amount spent on the build. Leave it unticked to keep that labour in operating expenses. Tick it to move the whole batch's labour and overhead into cost of sales when the rejection is exported, whichever recovery mode you chose.
5. Waste account check
Total Loss and Partial Recovery need a waste account, which is set in your accounting connection's settings. If there isn't one, the dialog shows Waste account not configured with a link to configure it, and Confirm Rejection stays disabled. Without an accounting connection there is nowhere to set a waste account, so only Full Recovery is available. See Waste Account Setup.
6. Add notes (optional)
Describe what went wrong and any corrective actions taken. The notes are saved with the build.
7. Confirm rejection
Click Confirm Rejection. Partsemble processes the recovery (restoring stock for recovered materials), records the rejection details, and, if there is anything to post, queues an export to your accounting system.
After Rejection
The build's final status depends on the recovery mode and the labour choice:
| Recovery Mode | Final Status | What Happens Next |
|---|---|---|
| Full Recovery | Rejected | Nothing — all materials restored, no export needed |
| Full Recovery, labour moved to cost of sales | Pending Export | The export moves the batch's labour and overhead to cost of sales |
| Total Loss | Pending Export | Waste export sends the loss to your accounting system |
| Partial (no loss) | Rejected | All materials happened to be fully recovered |
| Partial (with loss) | Pending Export | Waste export for the lost portion |
A full-recovery rejection goes to Pending Export only when the build has labour or overhead to move. With Total Loss or Partial Recovery with loss, a ticked labour box adds the labour to the same export.
Rejected builds with something to post follow the same export flow as normal builds — they can be auto-exported or manually exported, and failed exports can be retried.
Build Detail After QA
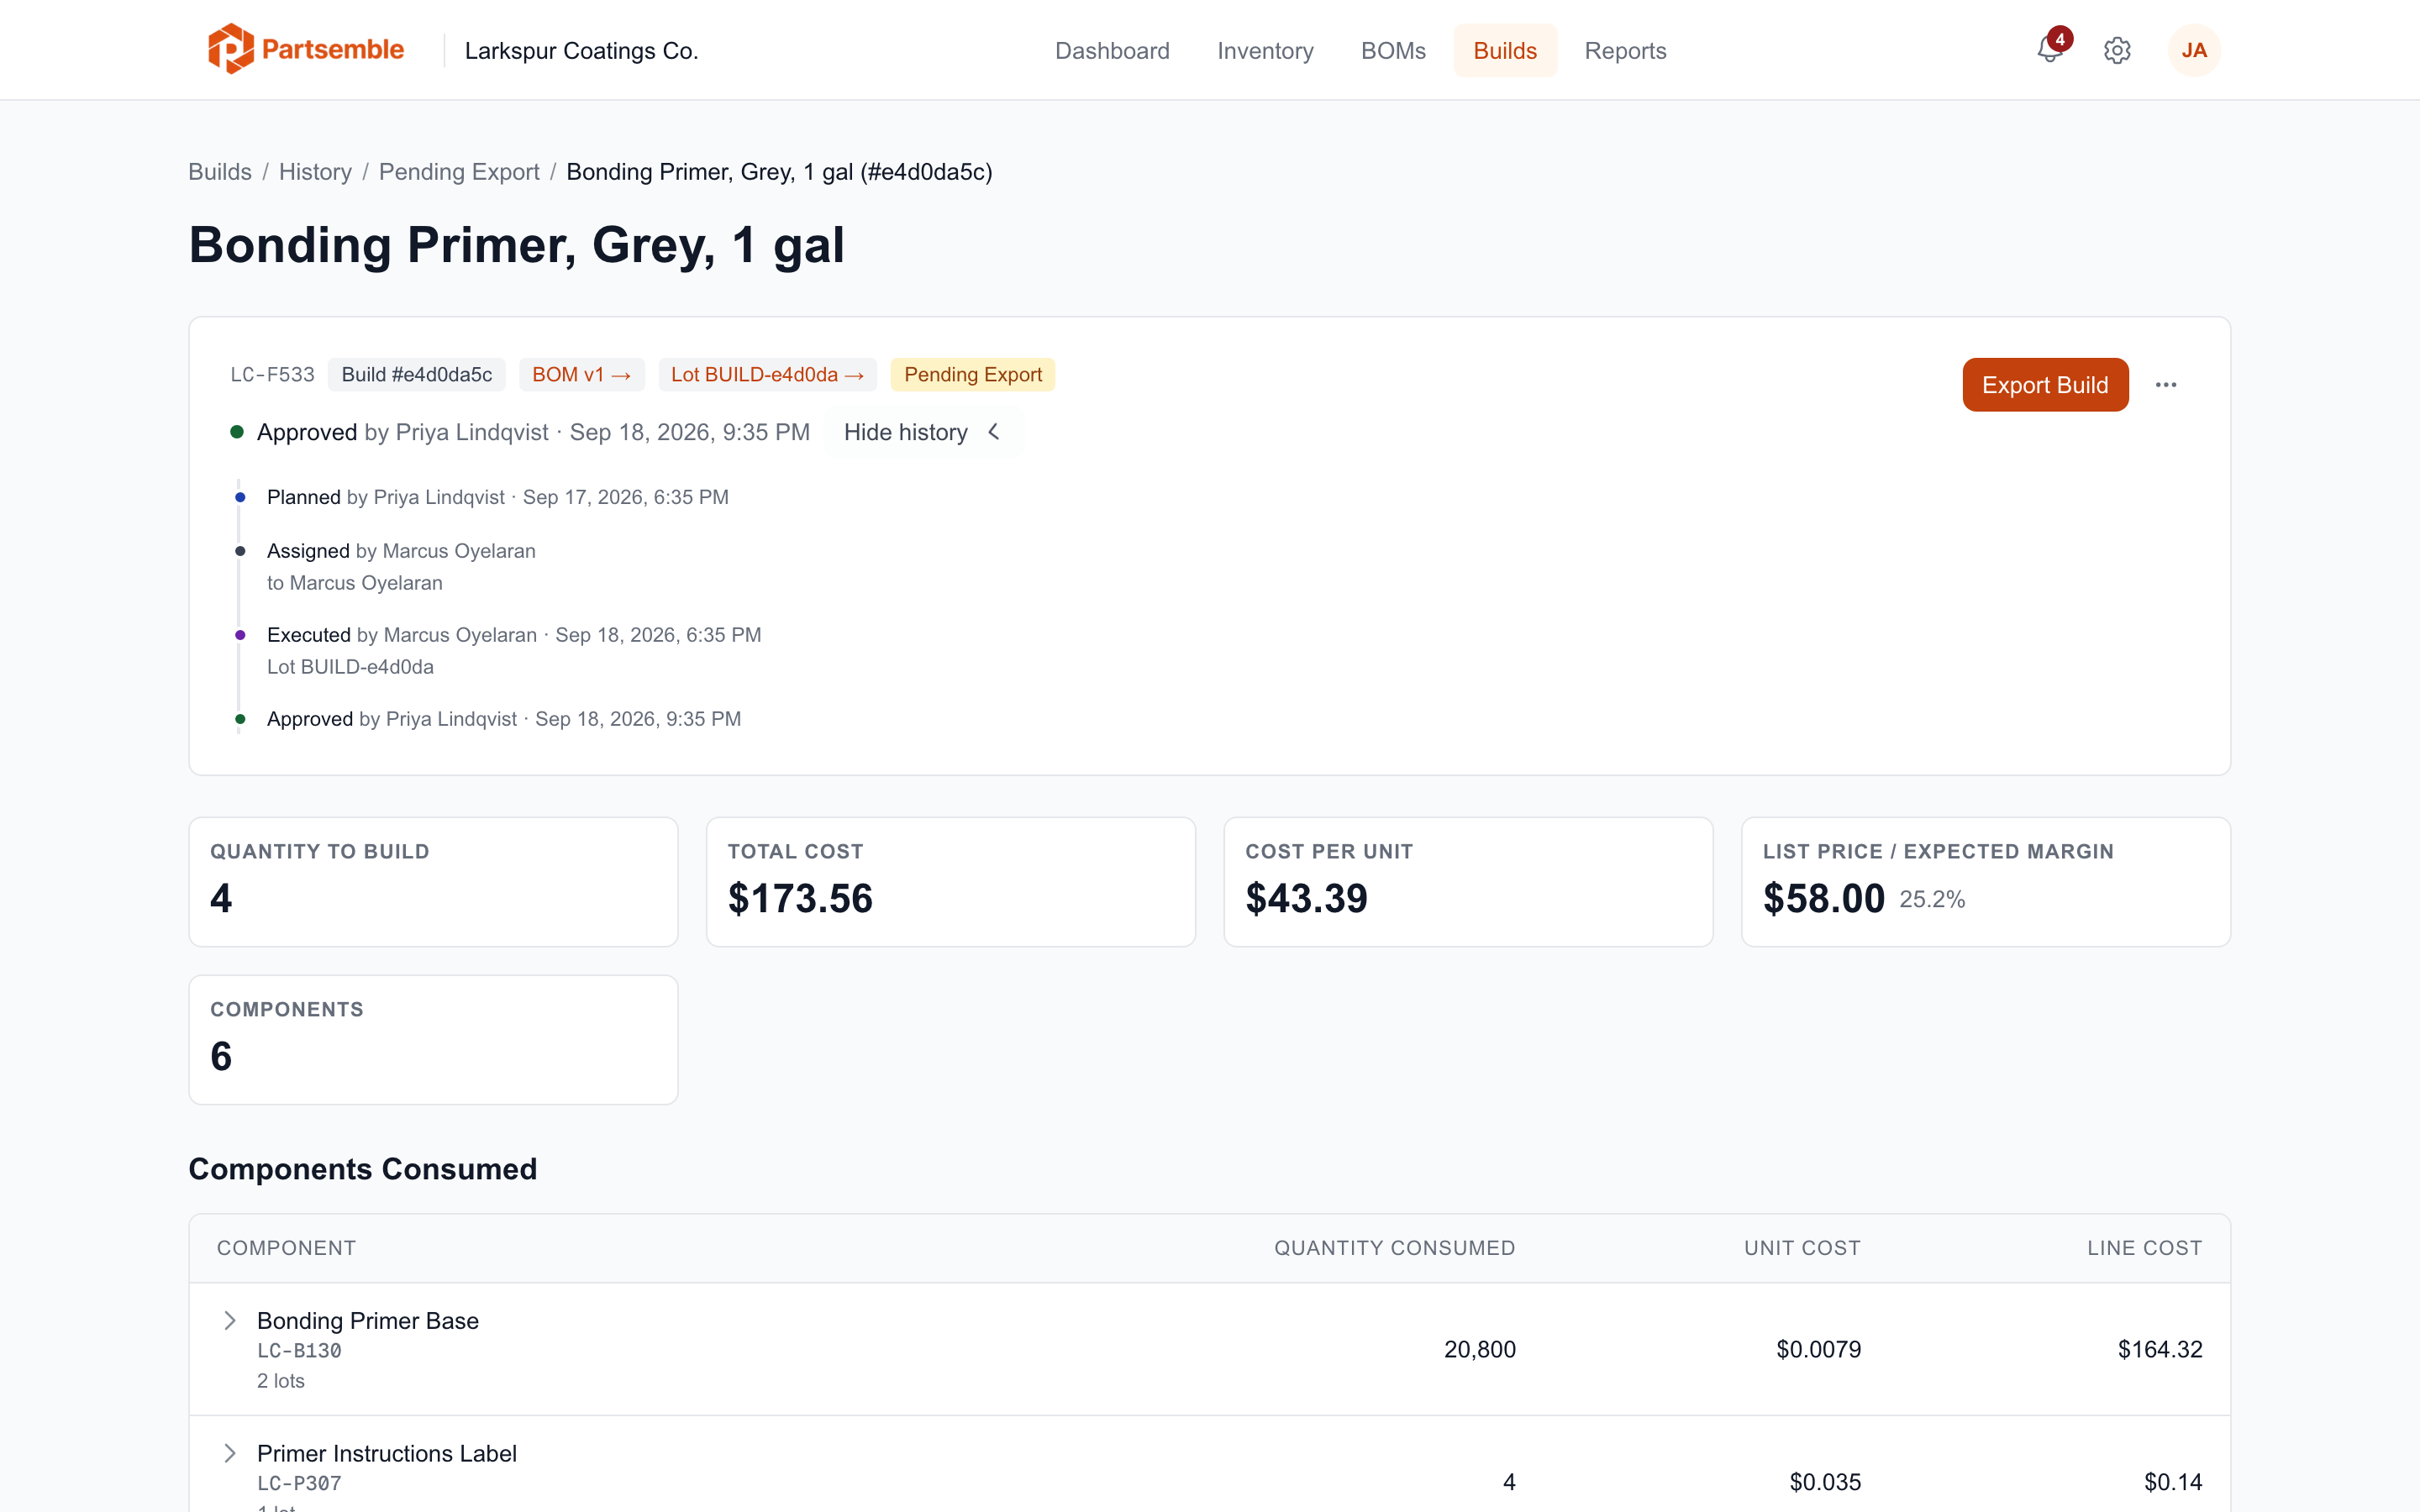
The review appears at the top of the build page: Approved by or Rejected by, the person's name, and the date and time. Click the events count next to it to open the build's history, where the review is listed with one more line:
- Approved — the approval notes, if any were added
- Rejected — the rejection reason and recovery mode, for example "Process Error — Full Recovery"
- Partial Recovery — a Recovery Details: table under the history shows each component's consumed, recovered and lost quantities
Rejection notes are saved with the build but are not shown on the build page.
This gives you a complete chain: who built it, who reviewed it, what the outcome was, and what happened to the materials.